 Computers
 Photography
 Food&Cook&Life
 Books
Books Off topic
(Disclaimer: no estoy asociado con Mercadona de ninguna manera. Voy a hacer la compra allí y en otros muchos sitios, pero este está cerca de casa…)
Sí, es posible obtener una pizza decente (decente — por supuesto no va a ser cómo una pizza hecha en horno de leña) con tu compra del Mercadona. Con un par de trucos te va a salir una cosa sabrosa, sana y incomparablemente mejor que las quiches que te mandan a casa a precios de atraco las cadenas tradicionales.
Empiezo con un “disclaimer” — yo soy italiano, y tengo claro que ninguna pizza que no se haga en 3 minutos en un horno de leña, con masa recién hecha que ha reposado toda la noche, va a ser una verdadera pizza (ok, Stefano? 😉). Pero esta se acerca algo, es económica, se prepara en el mismo tiempo en que pides un horror a la (x)Pizza(y) de turno, y por lo menos sabes lo que le has echado…
Esta pizza es con aceitunas negras y jamón cocido. Pero claro, la parte fundamental es la base — luego le puedes poner lo que quieras (siempre que sea en cantidades razonables, o sea, poco, y que no se desintegre en el horno mientras se hace, luego comento algo abajo).
Ingredientes

- La masa en sí. No está mal, por el precio que tiene; dice que se puede congelar pero no es verdad. Vale, sí se puede congelar, basta con echarla al congelador. Pero cuando la descongelas, entre que se pega al papel vegetal que tiene dentro y que ya no sube ni a tiros, vale sólo para jugar a hacer muñequitos.
- Salsa de tomate con albahaca y orégano. Ok, si te la haces tú sale mejor. Pero es cómoda y no está mal, de verdad. Lo importante es que no te pases de cantidad. Medio bote por pizza, máximo.
- Mozzarella (ugh. No es mozzarella, es fiordilatte, no creo que en Italia se pueda vender como mozzarella). Pero para la pizza está bien.
- Una hoja de papel de horno de verdad. La que viene con la pizza se carboniza con mi método… ver más adelante.
- (ya depende de lo que quieres echarle): estas son aceitunas negras malas (pero comodas) en rodajas. Si no eres tan perezoso como servidor, usa unas aceitunas mejores… total necesitas un puñado.
- El jamón cocido, un par de lonchas. Fuera de la foto.
Ok, preparamos la pizza.
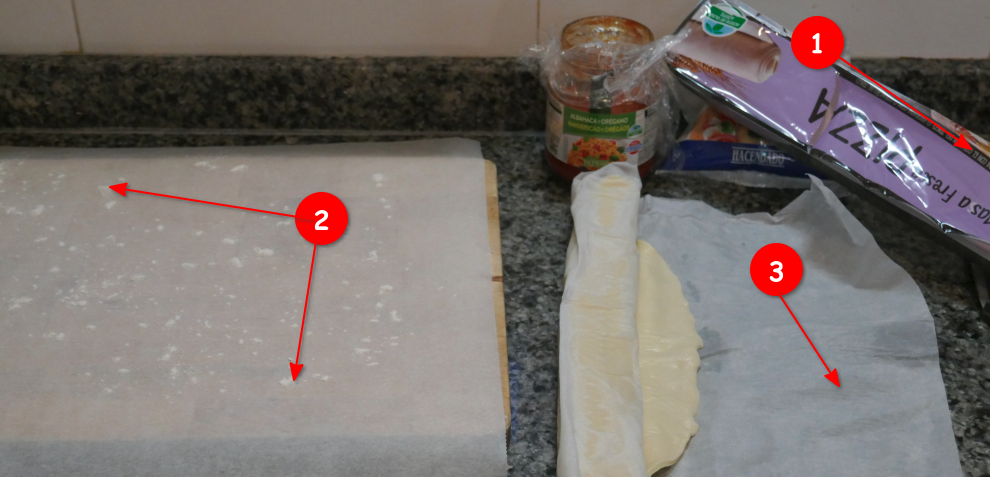
- Allí están las instrucciones de la masa. Ten cuidado en no leerlas; la primera vez puedes recortarlas y quemarlas en honor a las divinidades pizzeras. En general, recicla el envase. Prepara el horno: pon en el medio la bandeja más gorda y espesa que tengas (yo uso la de pyrex transparente encima de la rejilla), y pon el horno sin ventilación, calor arriba y abajo, y como decimos en Italia, a palla: todo lo que dé. El mío va a 270 °C (dice). Cuando el horno afirma (mintiendo) que está caliente, espera unos 5-10 minutos más.
- En el papel de horno de verdad, distribuye algo de harina, poquita. Este va a ir al horno directo, así que preparalo sobre algo de donde luego puedas deslizarlo al horno. NO lo prepares en la bandeja de horno directamente, esa tiene que estár MUY caliente cuando le deslizes la pizza encima.
- La base de la pizza en sí está en un papel de horno que a 270°C tienes suerte si no prende fuego. En su disculpa, está pensado para que tu siga las instrucciones que has quemado en el paso anterior, así que no seamos malos. Es útil para el paso siguiente.

- (opcional) sin quitar el papel de la base, yo suelo extender algo más la masa; me gusta la pizza fina (aquí en Italia puede desencadenar una guerra de religión sobre el tema, así que paso, los gustos son gustos). Sin exagerar, pero.
- Ahora hay que poner el tomate, medio bote del de arriba cómo mucho, unos 150-180 gramos. Uno de los errores base en las pizzas es pasarse con el condimento; eso hace que se moje demasiado la masa, que no se cueza bien a tiempo, y que te salga una pseudo-quiche pegajosa.
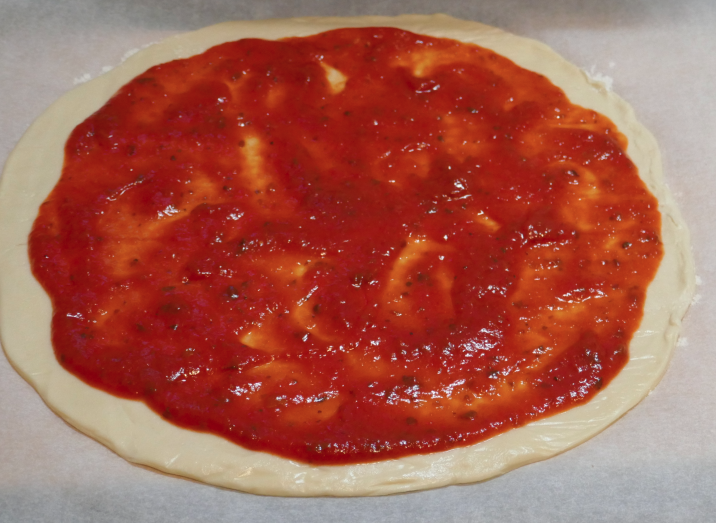
Este es la pinta que tiene que tener el tomate. No pasa nada si hay parches sin tomate. Deja una banda alrededor del tomate sin nada, y sigue dejandola sin nada hasta el final, cuando pondrás un hilo de aceite virgen extra alrededor.
- Ahora pon los ingredientes y la mozzarella hecha trocitos. Ya sé que me repito, pero es importante no sobrecargar la pizza; la masa tiene que tener parte de protagonismo, y se tiene que poder hacer bien sin que los componentes queden crudos.

Este es la pinta final, con su “vueltecita” de aceite alrededor, lista para entrar en el horno. Podéis inventar lo que queráis; con cebolla cortada fina y butifarra, con los restos de verdura asadas de ayer, con anchoas (sin mozzarella en ese caso), con varios tipos de quesos, son setas — pero poquito de todo!
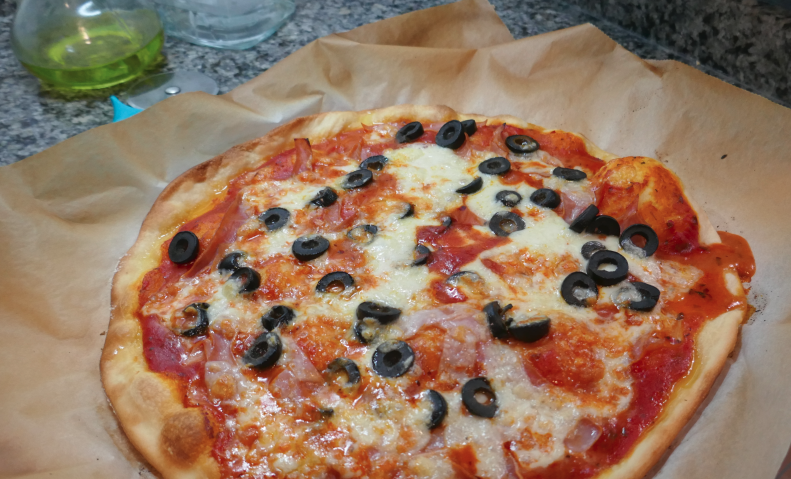
- Finalmente, ponla en el horno. Abre rápidamente para que no se enfríe y desliza el papel de horno con la pizza en la bandeja, y cierra ¡ya!. Tardará en hacerse como en la foto inicial unos 10-12 minutos (sí, no más, a lo mejor menos si tu horno es mejor). La primera vez controlala, luego le pillarás el tranquillo. En este tiempo puedes preparar la siguiente sin ningún problema si necesitas un par de ellas.
- Hay que comerla caliente, no la dejes enfríar si no todo el trabajo para que la masa quede crujiente se va al garete.
Esta pizza (compartida entre tres), con dos cervezas en copa helada y un zumo de naranja para la jovenzuela, seguida de un helado es nuestra cena con peli del viernes. Se hace en un plis plas y aunque no sea la pizza de Stefano, bueno, dá el pego y se deja comer.